I Strapped a Tiny Screen to My Desk and Now I Can't Stop Adding Things to It
I saw a project by @acervenky on GitHub where they'd wired up a small OLED screen to show their Claude usage in real-time. I instantly loved the idea. Their execution wasn't quite for me though - I like my widgets to look shiny. I'm a software guy not a hardware guy, so I like my hardware projects to be like a Lego set at their most complex.
I wanted something that could sit under my main monitor and look like it belonged there. A passive display I could glance at without context-switching to another window. Something that felt premium, with minimal soldering and no bare wires.
Here's what I built, so that you can build it too if you like.
The Hardware
I went with:
- Raspberry Pi Zero 2 W (pre-soldered headers, because life's too short)
- Pimoroni HyperPixel 4.0 Square Touch - a 720x720 IPS display that connects via DPI
The HyperPixel is absurdly nice for the price. 720x720 at 60fps on a square form factor gives you a lot of pixels to play with, and the IPS panel means it looks good from any angle. The Pi Zero 2 W sits on the back of it like a backpack. The whole thing is about the size of a Post-it note. I particularly liked that the only hardware work to do here is push the Pi Zero's pins onto the back of the Hyperpixel - full lego mode!

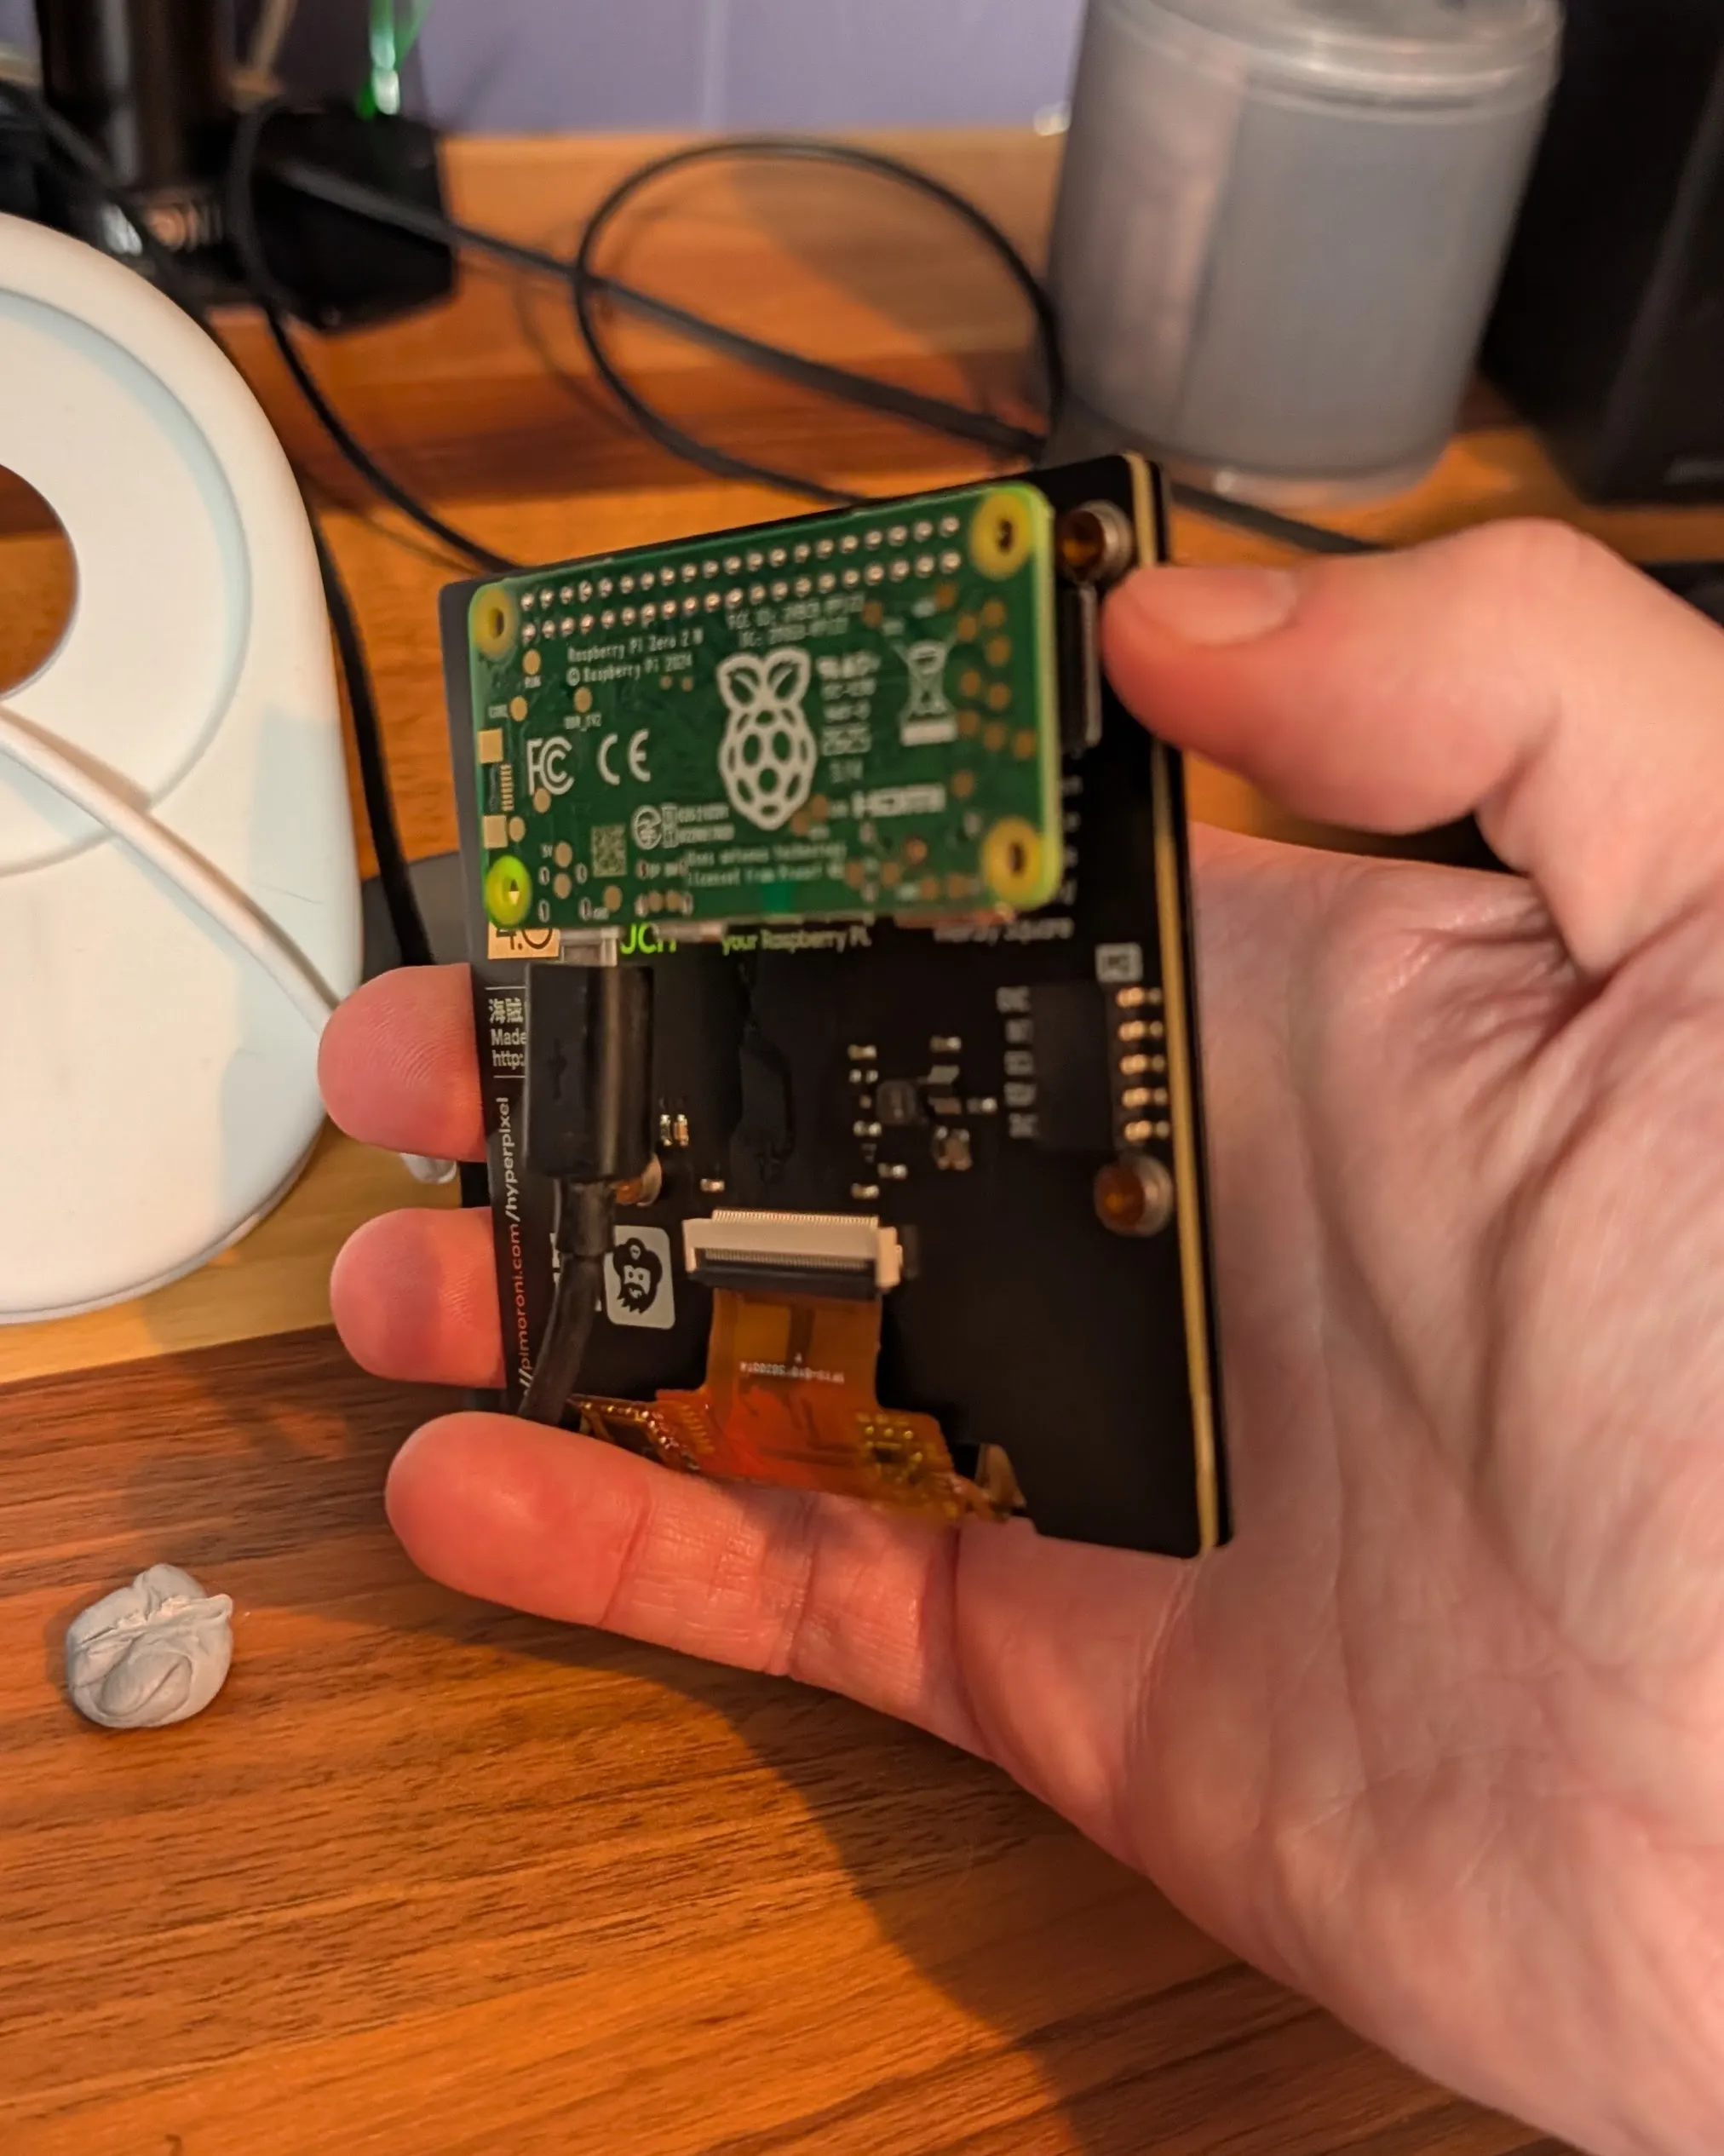
The downside: the HyperPixel eats every GPIO pin on the Pi, so there's no room for additional hardware, should you be so inclined. And the Pi Zero 2 W only has 512MB of RAM, which means Chromium is on a permanent diet.
The Case
The screen's been sitting in a phone stand while I wait for a proper enclosure. I found a purpose-built case for this exact combo on Cults3D by printminion - they've designed desktop cases for the HyperPixel 4.0 Square + Pi Zero in both freestanding and screw-mount variants.
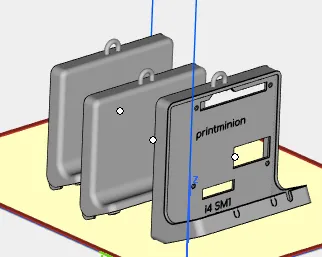
I don't own a 3D printer, so I uploaded the STL to 3dprint-uk.com and got a quote (with nice finish add-ons) for ~£60 including delivery. Then I discovered their £60 new customer discount, and it was karma - free case 🎉🥳
For a one-off custom enclosure with a vapour-smoothed finish, that's hard to argue with. It's due mid-April. Come back if you'd like to see the final product once it arrives.
[TODO: Placeholder for finished product image with case]
The Software
I considered ways to get a dashboard displaying on the Hyperpixel, such as:
- FrameOS - Lets you write dashboard layouts in its own framework
- Direct Framebuffer rendering - e.g. with Pygame or Tkinter, super light but you lose a lot of batteries included stuff like layout, fonts, CSS.
- Browsers - HTML/CSS, nice and easy, more memory hungry.
I went with a browser, why make life hard? Chromium's pretty memory hungry but it's standing up very well so far. If it struggled I had a plan to look at lighter web kiosk-mode-supporting browsers like kweb or Surf.
The whole stack is deliberately minimal. Vanilla JavaScript on the frontend (no React, no build step), Python with Flask on the Pi. The dashboard is a single HTML file.
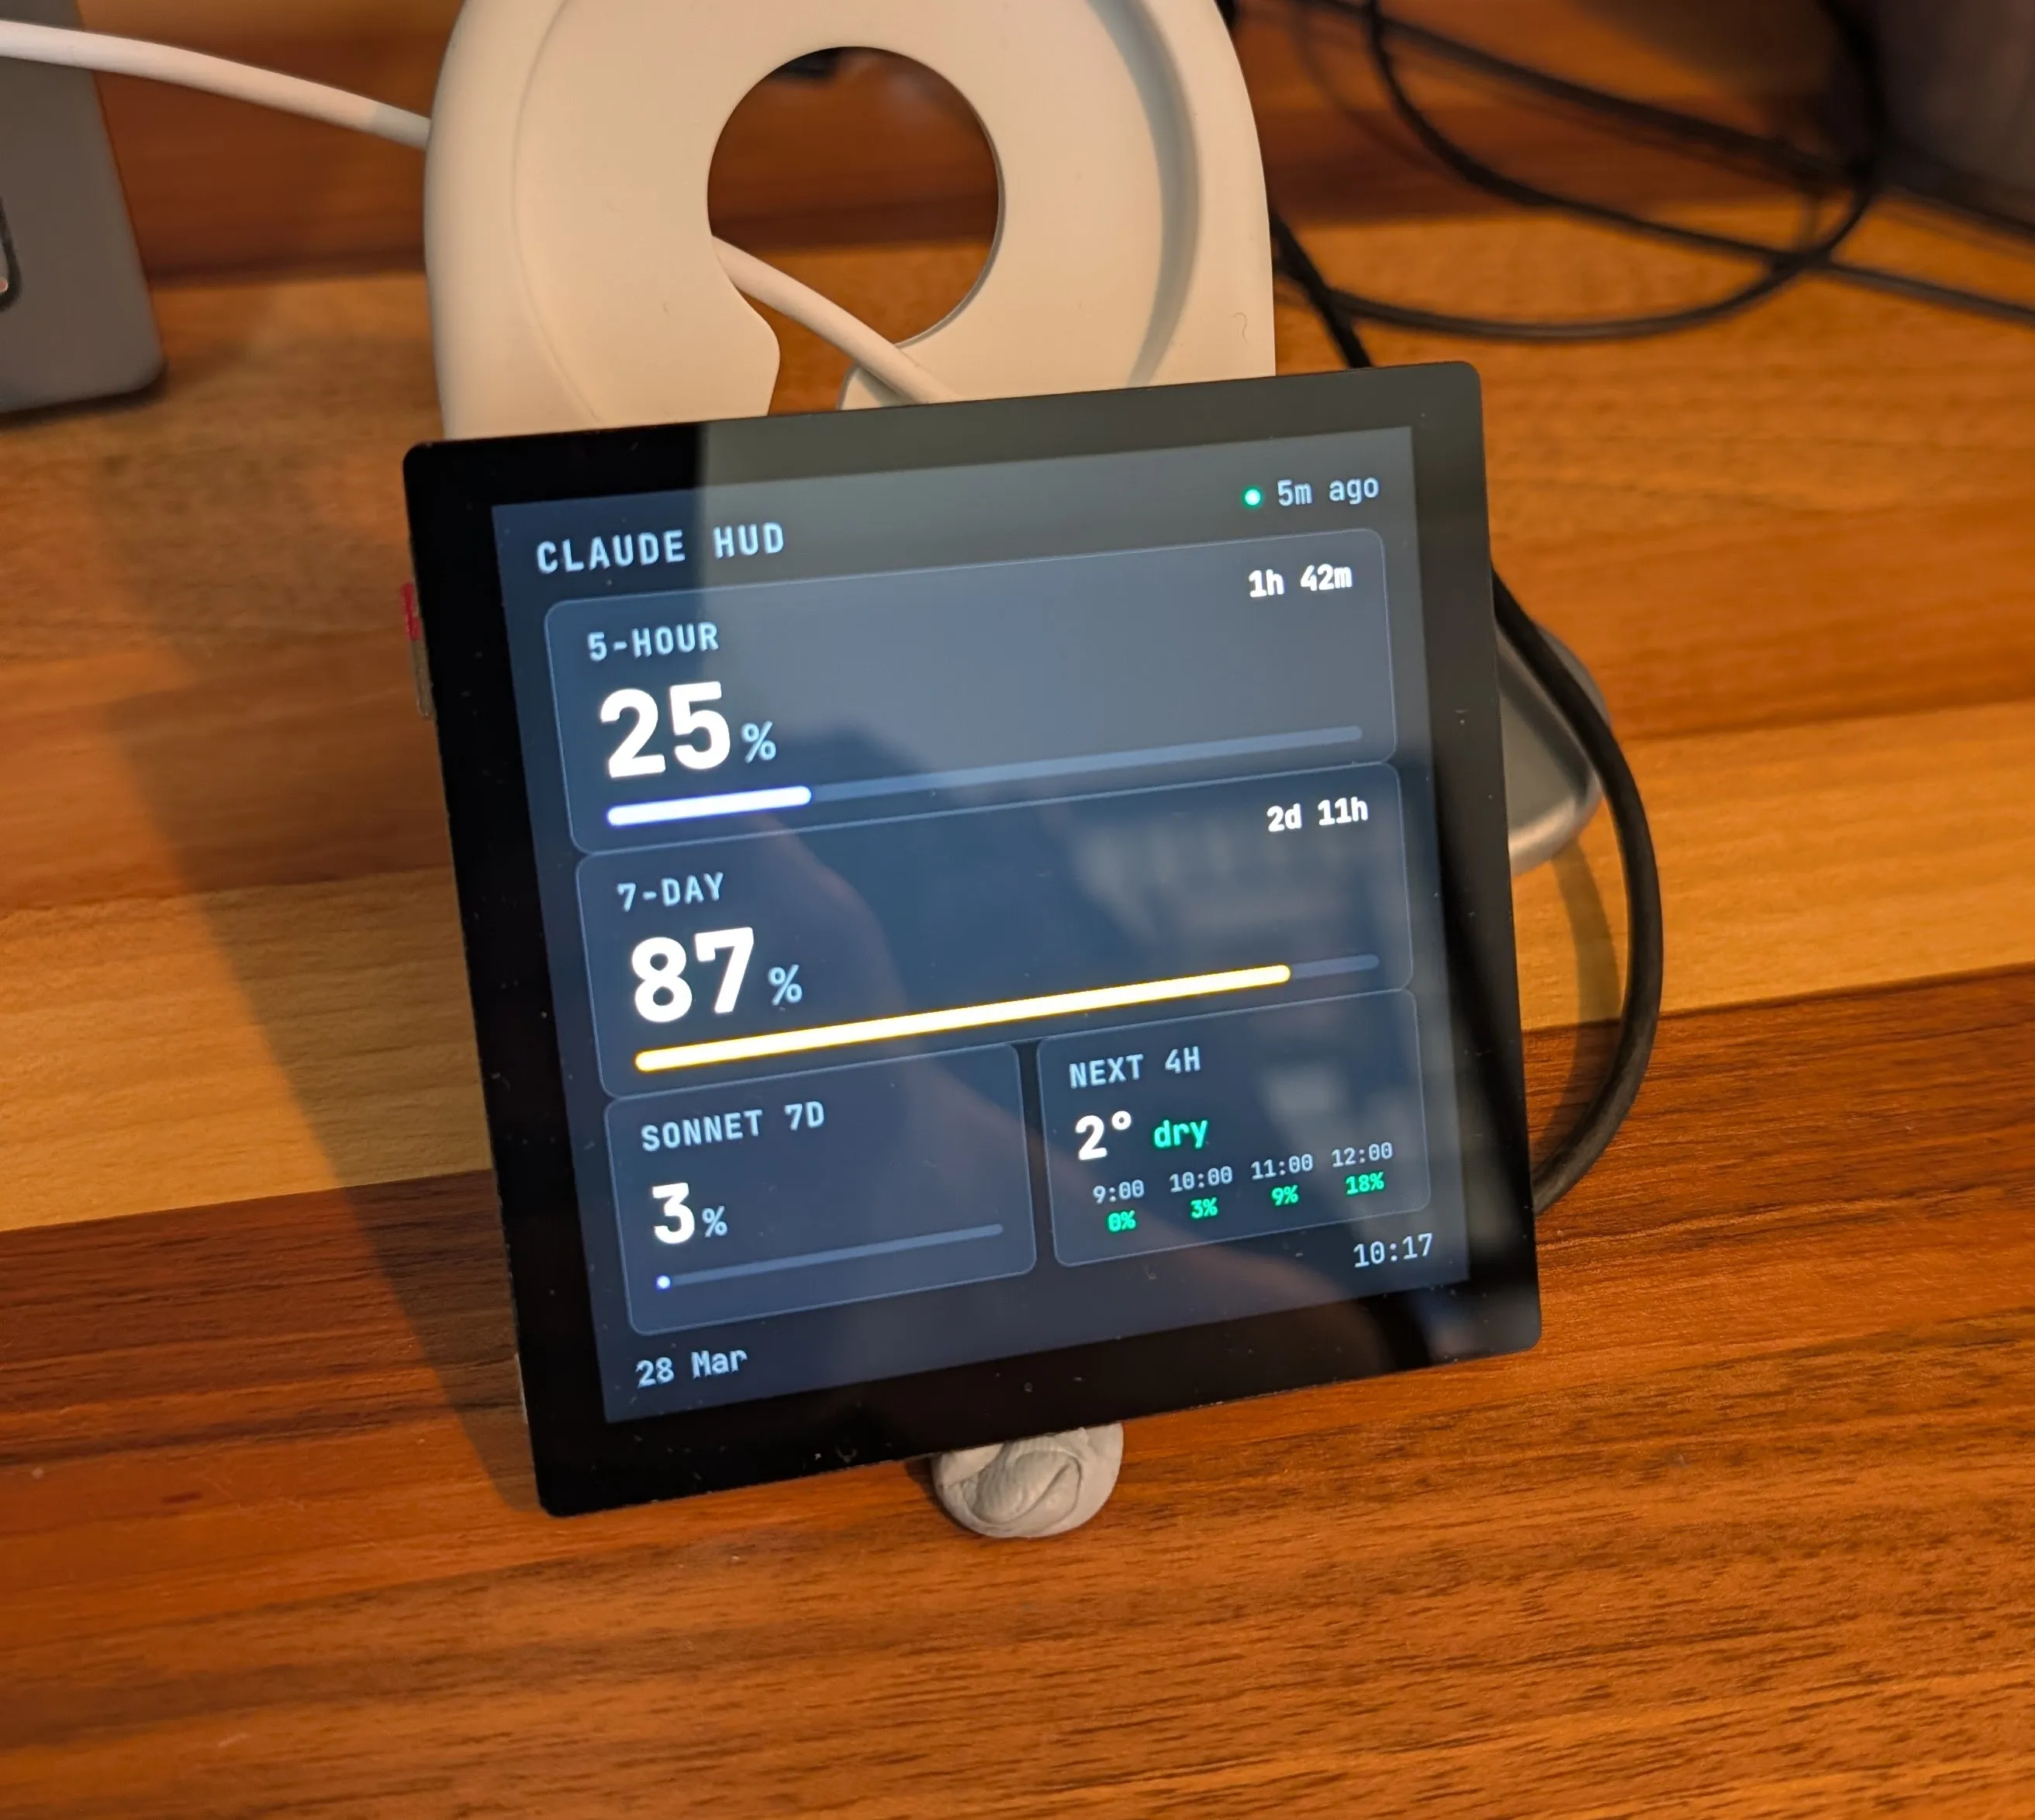
Claude Usage
This was the original reason for the project. I'm a heavy Claude user and I wanted to see my utilisation at a glance - the 5-hour rolling window, the 7-day window, and model-specific breakdowns for Sonnet and Opus.
The trick, as @acervensky described, is that Claude's usage data comes from an undocumented API endpoint. It's tricky to maintain claude.ai authentication from the Pi, especially when load balancing between multiple Max accounts. Instead a Tampermonkey userscript runs inside my Claude browser tab, polls the endpoint every 5 minutes, and POSTs the data to the Pi over the LAN. It only sends data when something changes, and only during waking hours.

It's a bit of a hack TBH. The userscript has to run on my desktop, which means if my desktop is off, the display goes stale. I'm okay with that trade-off because when my desktop is off, I'm generally not using Claude from my desk.
One quirk worth mentioning: You'll notice that the Tampermonkey script polls for my org ID on every run. You might think this is an inefficiency, but because I load balance Max accounts most months this lets the script latch on to the 'active' one and send that data to the Pi.
Weather
I had some space to fill on the main screen so a compact, 4-hour forecast sits alongside the Claude gauges. It pulls from Open-Meteo's free API every 30 minutes - feels-like temperature, rain probability, and a text summary. The rain thresholds are tuned for the UK where "40% chance of rain" means "it's going to rain."
Optional Add-ons
The core display works really well on its own with just the Claude usage gauges and weather. But once you have a screen on your desk, you start finding things to put on it. So think of these as optional extras:
Spotify Now Playing
The dashboard has two pages you can swipe between with touch - Claude metrics and weather on page one, Spotify album art on page two.
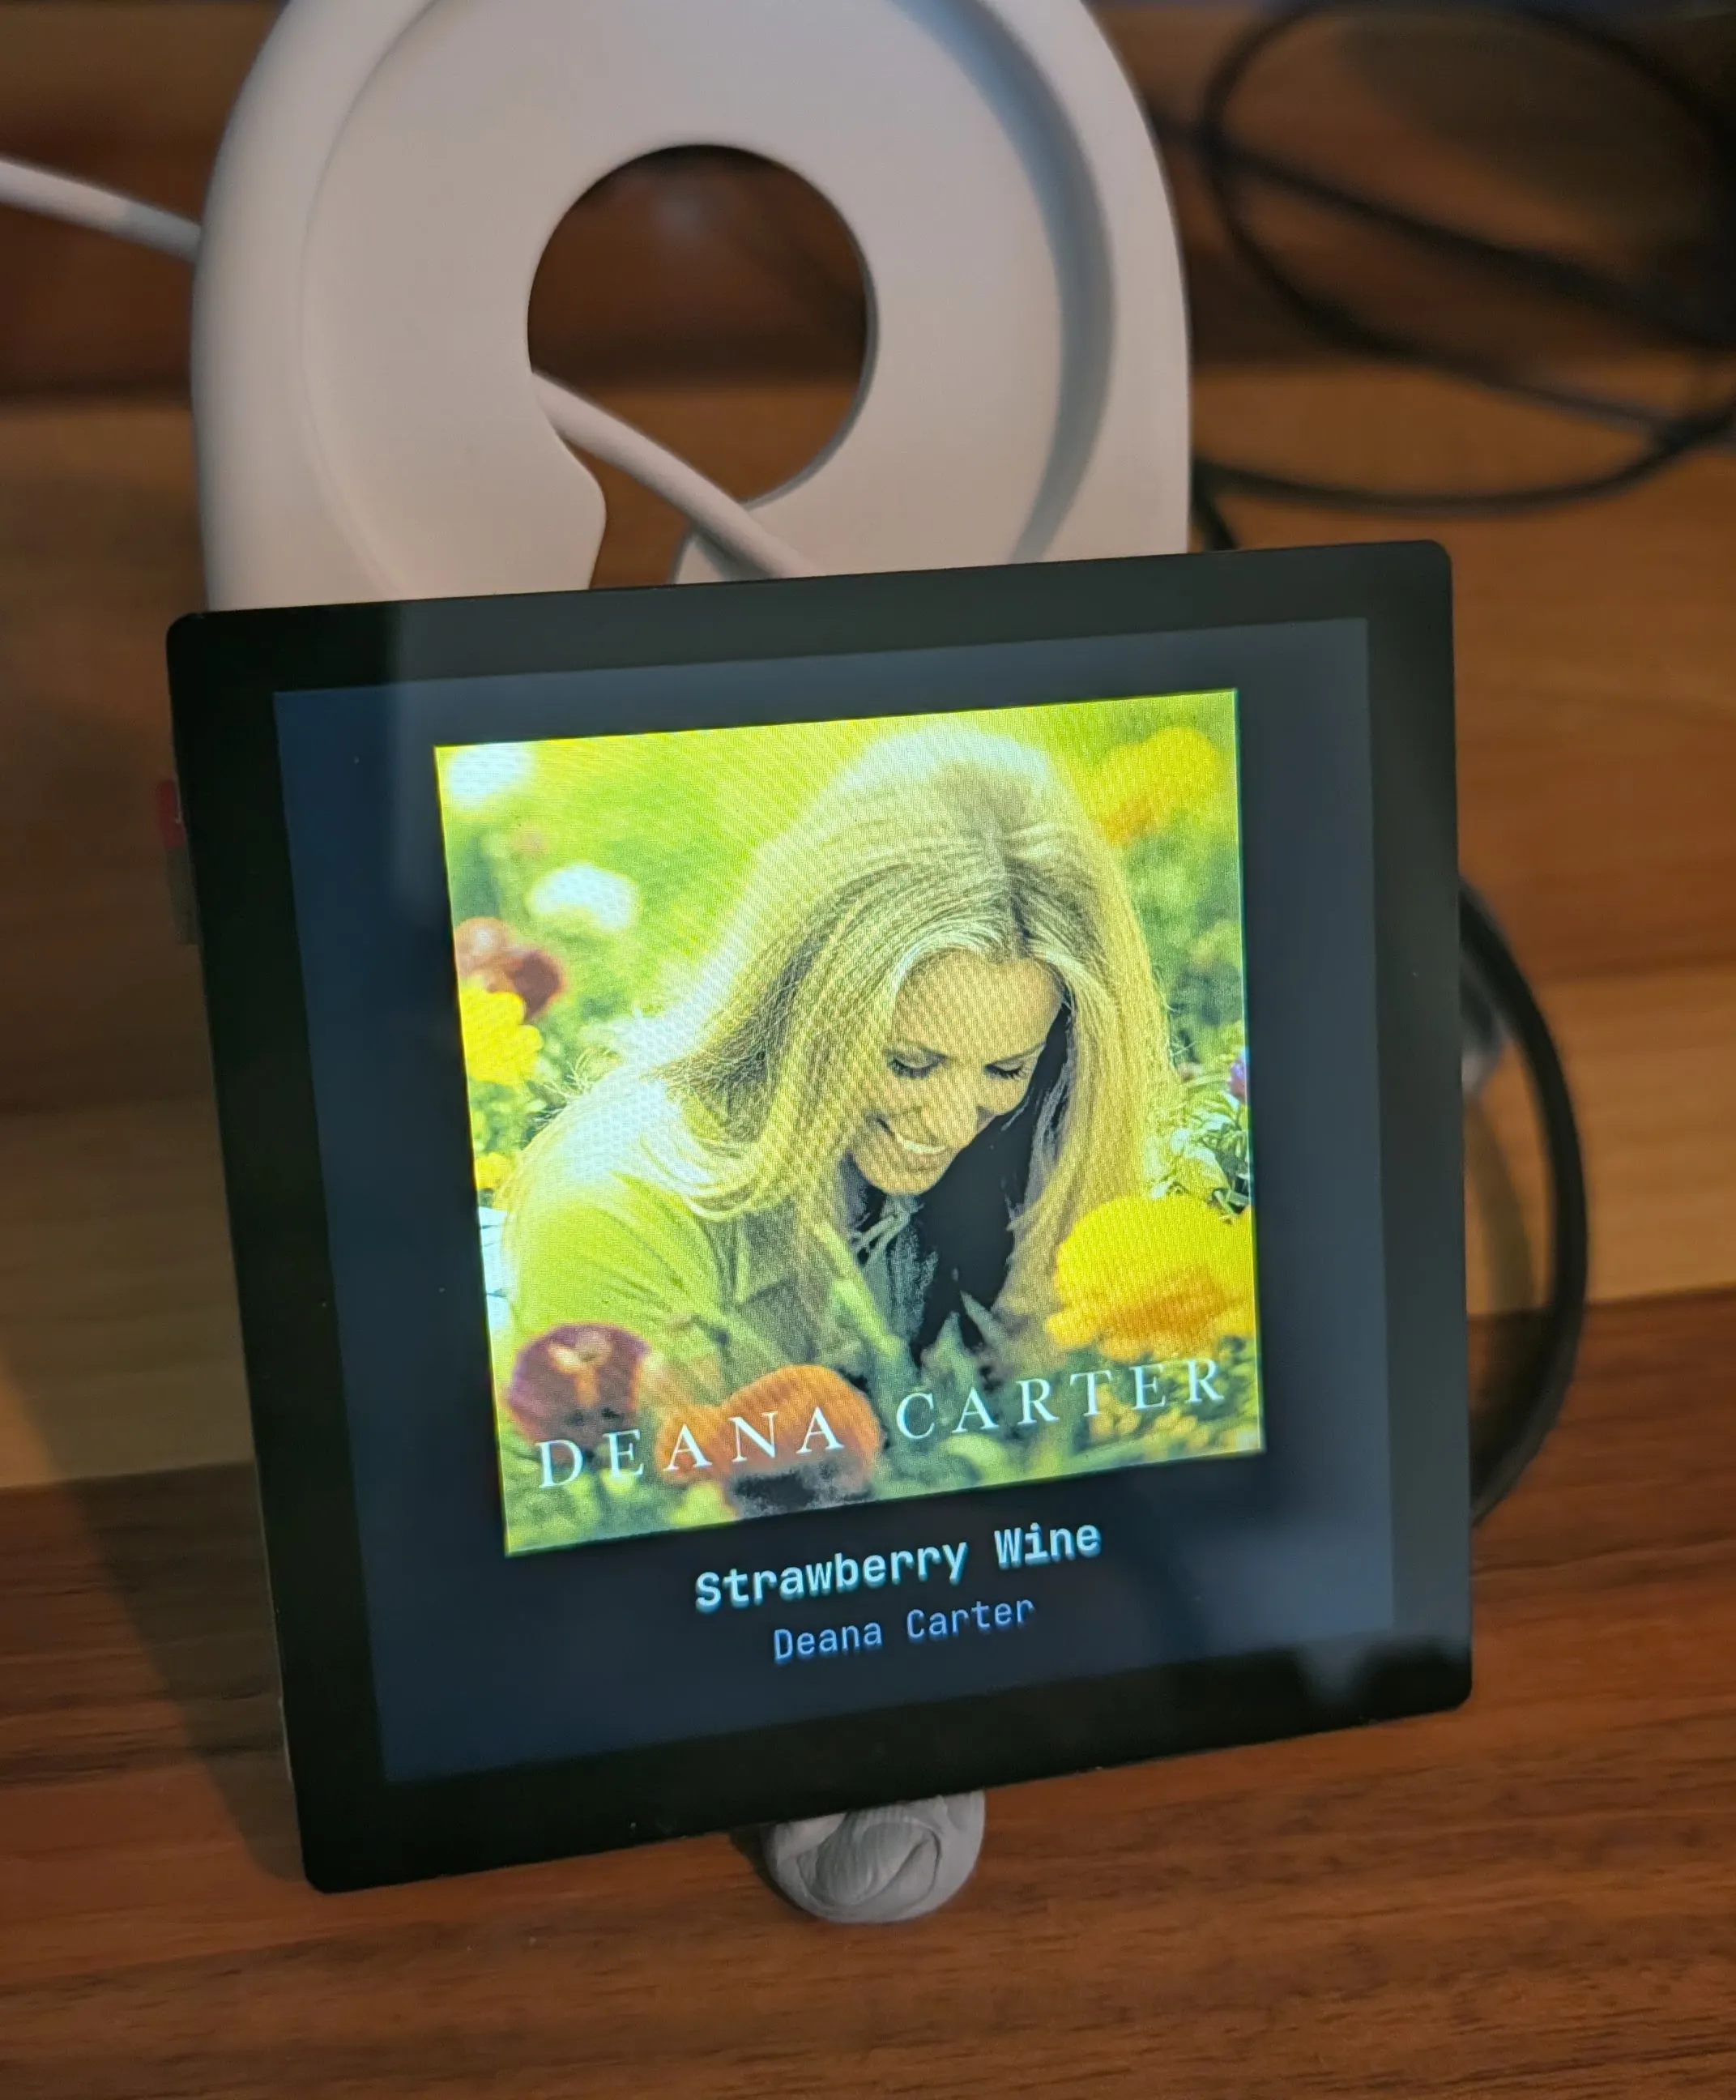
I'm not sure the Pixel's camera has done this justice, graphics are crispy IRL.
The Spotify integration is also a desktop integration. It's event-driven - a systemd service on my desktop watches playerctl for track changes via D-Bus and pushes updates to the Pi instantly. No polling. The album art renders at 640px in a dark-themed card with the track title and artist below it. Handy if you fancy a change from the Claude dashboard, and I've always wanted to better appreciate the songs I listen to somewhat randomly on Spotify day-to-day.
Ring Doorbell Video
This one requires Home Assistant, but if you've already got that running it's worth the setup. When someone rings the doorbell I often find it too cumbersome/slow to open the Ring app to check who's there - they're waiting the whole time while I do that. Home Assistant with a couple of additions can start the video streaming and notify the Pi, then the entire display is taken over by a live video feed from the Ring doorbell camera.
The chain goes: Home Assistant detects the ding via WebSocket, a watcher script on the Pi turns on Ring's live stream, the Pi dashboard opens a WebRTC connection through go2rtc, and within a few seconds you're looking at whoever's at the door.
[PHOTO: Front of screen showing Ring doorbell overlay]
The video stream runs through Ring's cloud (Ring doesn't support local streaming), but WebRTC keeps the latency under a second once it's connected. It auto-dismisses after 45 seconds or you can tap the screen. The live stream switch is turned off afterwards to preserve the doorbell's battery.
Setting up the video pipeline required a few moving parts: ring-mqtt as a Home Assistant app for RTSP access, go2rtc (also as an HA app) for RTSP-to-WebRTC conversion, and a small Flask proxy on the Pi to handle CORS. But once it's wired up of course, it just works.
The Backlight
The HyperPixel's backlight is controlled via PWM on GPIO 19. There's a schedule - it comes on at 6:30am and goes off at 9pm - but manual brightness changes via the API persist until the next transition. At 80% brightness it's visible without being distracting below my main monitor.
What I'd Do Differently
Not much, honestly. The reliance on my desktop for the Claude stats is the main weakness. The doorbell watcher and Spotify pusher also run on the desktop. In theory these could all run on the Pi itself, but with only 512MB of RAM, Chromium already breathing heavily and complexities of maintaining Claude auth on a relatively inactive device, I haven't pushed it.
If I were starting again, I might look at the Pi Zero 2 W's 512MB limit more seriously and consider a Compute Module or a Pi 4. But for a passive display that mostly just renders pre-pushed data, it's fine and worth it for the small form factor.
Parts List
| Part | Price |
|---|---|
| Raspberry Pi Zero 2 W (pre-soldered headers) | £17 |
| Pimoroni HyperPixel 4.0 Square Touch | £55 - punchy but high end |
| SanDisk Extreme 64GB microSD | £10 |
| 3D printed case with vapour smoothing (3dprint-uk.com) | £60 (actually free) |
| Total | £142 (£82 after free printing) |
Power comes from a micro-USB cable plugged into an existing USB hub, so no additional PSU needed.
The Code
Everything's on GitHub if you want to build your own. It's a Tampermonkey userscript, a Flask server, a single HTML dashboard, and a doorbell watcher - all under 1,500 lines total.
Credit to Venkatesh Surve for the original inspiration. I took the idea in a different direction - prioritising ease of assembly and a premium feel over raw cost savings - but the core concept of "tiny screen showing Claude usage on your desk" is from his mind.